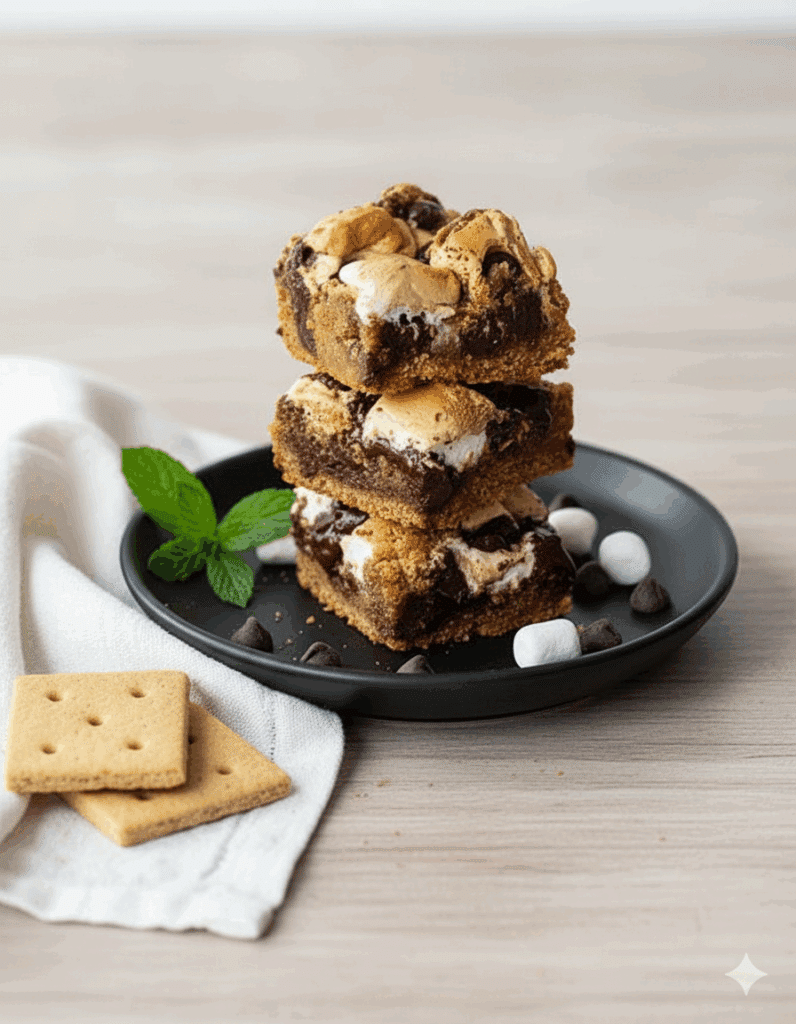
Sweet, sticky, and totally irresistible — these Gluten Free S’mores Bars capture all the nostalgia of summer nights by the fire, but no campfire (or sticky fingers) required. Imagine layers of buttery graham cookie crust, molten chocolate, and creamy marshmallow fluff baked into one chewy, golden square of pure happiness.
Whether you’re gluten-free or not, one bite of these gooey dessert bars and you’ll be hooked. Perfect for BBQs, potlucks, or cozy weekends when you crave something sweet and nostalgic.
The Best Gluten Free S’mores Bars Ever
Let’s be honest — nothing beats a classic campfire s’more. But if you’re gluten-free, traditional graham crackers can make that experience a little complicated. Many gluten-free versions are tasty but tend to be thicker and harder, which means the marshmallow and chocolate squish out the sides the second you take a bite.
Enter these Gluten Free S’mores Bars — the ultimate solution. They’re built on a soft, buttery cookie base made with gluten-free graham cracker crumbs. That means you still get all the classic flavors — toasted marshmallow, smooth chocolate, and buttery graham — in a mess-free bar that’s easy to make and even easier to share.
The result? A dessert that tastes like summer all year long.
Why You’ll Love These Bars
- Totally Gluten-Free: Made with simple gluten-free ingredients, no complicated substitutions needed.
- Ooey Gooey Texture: Layers of soft cookie, melted chocolate, and marshmallow fluff create that classic s’more magic.
- Easy to Make: Just mix, layer, and bake — no campfire or fancy tools required.
- Perfect for Sharing: Slice into squares for an irresistible party or picnic dessert.
Ingredients You’ll Need
You probably have most of these ingredients in your pantry already. Here’s what goes into the magic:
- Gluten Free Baking Flour Blend: Use a 1-to-1 gluten-free blend that includes xanthan gum for the perfect texture.
- Gluten Free Graham Cracker Crumbs: Either crush your favorite gluten-free graham crackers or buy pre-made crumbs.
- Baking Powder: Adds a little lift to the cookie base.
- Salt: Balances out all the sweetness.
- Butter (or Vegan Butter): Creates that rich, buttery flavor. Use plant-based butter for dairy-free bars.
- Brown Sugar: Adds sweetness and chewiness.
- Egg: Binds the cookie base together.
- Vanilla Extract: Enhances the overall flavor with a cozy warmth.
- Marshmallow Fluff or Creme: This is key! Don’t use actual marshmallows — they’ll melt and disappear.
- Chocolate Chips: Use dark or semi-sweet chocolate to balance the sweetness.
Tips for Perfect Gluten Free S’mores Bars
A few small tricks can make a big difference in how these bars turn out. Keep these in mind:
1. Measure Flour the Right Way
Spoon the flour into your measuring cup, then level it off. Don’t scoop straight from the bag — that can pack too much flour and make your bars dense.
2. Let the Dough Rest
Gluten-free flour needs a few minutes to hydrate after mixing. Let your dough rest for about 5 minutes before layering.
3. Cool and Rest Before Slicing
After baking, let your bars cool completely and then rest for at least 12 hours. This helps the cookie base set and slice cleanly. (It’s worth the wait — promise!)
4. Chill for Perfect Squares
For those clean, bakery-style cuts, chill the bars in the fridge for an hour before slicing. They’ll look picture-perfect!
How to Make Gluten Free S’mores Bars
These bars are simple, but layering them properly gives you that signature gooey look and texture. Here’s the step-by-step:
Step 1: Make the Cookie Base
Cream together the butter and brown sugar until light and fluffy — about 2 minutes. Then beat in the egg and vanilla until just combined.
Step 2: Add the Dry Ingredients
Whisk together the gluten-free flour, graham crumbs, baking powder, and salt. Add this mixture to the wet ingredients and mix until just combined. Let the dough rest for 5 minutes.
Step 3: Layer the Goodness
Line an 8×8-inch baking pan with parchment paper (for easy removal).
- Layer 1: Spread a little more than half the dough evenly into the bottom of the pan using damp fingers.
- Layer 2: Spread the marshmallow fluff gently over the base. Dip your spoon in water if it sticks.
- Layer 3: Sprinkle chocolate chips evenly over the fluff.
- Layer 4: Scoop the remaining dough and dot it across the top. It doesn’t need to fully cover — the marshmallow will puff up beautifully through the gaps.
Step 4: Bake to Perfection
Bake at 350°F (175°C) for 30–35 minutes, or until the top is golden and slightly crisp. The marshmallow layer may look a little jiggly when you pull it out — that’s normal! It will firm up as it cools.
Step 5: Cool, Rest, and Slice
Let the bars cool completely on the counter, then rest for 12 hours before slicing. For clean edges, chill before cutting.
These bars are rich, so small squares are perfect for serving.
Storing Your S’mores Bars
Store leftovers in an airtight container at room temperature for up to 3 days, or refrigerate them for up to 5 days. They taste amazing chilled or slightly warmed in the microwave for a few seconds if you want that gooey “freshly baked” feel again.
PrintGooey Gluten Free S’mores Bars – A Campfire Classic Made Easy
- Total Time: 50 min
Description
These Gluten Free S’mores Bars are sweet, sticky, and irresistibly gooey — no campfire needed! Layers of buttery graham cracker cookie dough, rich chocolate chips, and creamy marshmallow fluff bake into the perfect treat for any time of year. Whether you’re gluten-free or just love s’mores, this simple dessert will become an instant favorite.
Ingredients
1 cup gluten free baking flour blend (with xanthan gum)
1 cup gluten free graham cracker crumbs
½ teaspoon baking powder
¼ teaspoon salt
½ cup unsalted butter or vegan butter, softened
¾ cup brown sugar, packed
1 large egg
1 teaspoon pure vanilla extract
7 oz (about 1 cup) marshmallow creme or fluff (Marshmallow Fluff brand recommended)
1¼ cups dark or semi-sweet chocolate chips
Instructions
-
Preheat your oven:
Set oven to 350°F (175°C). Line an 8×8-inch baking dish with parchment paper or lightly grease it with nonstick spray. -
Make the cookie dough:
In a mixing bowl, cream together the softened butter and brown sugar for about 2 minutes until light and fluffy. Add the egg and vanilla, mixing just until combined. -
Add dry ingredients:
In a separate bowl, whisk together gluten free flour, graham cracker crumbs, baking powder, and salt. Add to the wet ingredients and mix until combined. Let the dough rest for 5 minutes to hydrate. -
Assemble the layers:
-
Press a little more than half the dough evenly into the bottom of the pan.
-
Gently spread the marshmallow fluff over the top. (Tip: dip the spoon in water to prevent sticking!)
-
Sprinkle chocolate chips evenly over the fluff.
-
Drop the remaining dough by spoonfuls over the top — no need to cover it completely.
-
-
Bake:
Bake for 30–35 minutes, or until the top is golden brown and the edges are set. The center may still look a little soft — that’s the gooey marshmallow layer. -
Cool and rest:
Allow bars to cool completely, then rest for at least 12 hours before slicing for best texture. Chill for an hour if you want clean, bakery-style cuts. -
Serve and store:
Cut into small squares and enjoy! Store leftovers covered at room temperature for up to 3 days, or refrigerate for up to 5 days.
Notes
- Flour: Use a gluten-free 1:1 blend that includes xanthan gum (like Bob’s Red Mill). If your blend doesn’t, add ½ teaspoon of xanthan gum.
- Marshmallow: Do not substitute with regular marshmallows — they’ll melt and disappear into the crust.
- Vegan Option: Swap butter for plant-based butter and ensure your marshmallow fluff is vegan-friendly.
- For Extra Indulgence: Sprinkle flaky sea salt on top before baking for a sweet-salty finish.
- Prep Time: 15 min
- Cook Time: 35 min
- Cuisine: American



Leave a Reply